

If you've worked in pharmaceutical manufacturing long enough, you know that one of the most high-stakes, high-precision processes is switching syringe sizes on aseptic filler equipment. As a supplier of specialized aseptic syringe filling equipment, I've seen firsthand how messy, inconsistent, or even dangerous that switch can go when done wrong-all while trying to keep your production line running, meet FDA and cGMP guidelines, and avoid costly downtime. The truth is, changing over between different syringe sizes isn't just a physical adjustment; it's a sequence of validated, controlled steps that balance speed, sterility, and accuracy. Let's break down exactly how to nail that changeover, based on years of working with pharma teams of all sizes, from small biotechs to large-scale commercial manufacturers.
First, let's clarify why this changeover is so critical. Aseptic fillers work in a ISO Class 5 or 7 controlled environment, where even a single particle of contamination can ruin a batch of pre-filled syringes-products that will eventually go to patients. Syringe sizes range from tiny 0.5mL insulin syringes to 6mL or larger syringes for biologics, and even a half-millimeter shift in the nozzle tip, plunger stop, or feed track can lead to under-filling, over-filling, damaged syringe barrels, or (worse) compromised sterility. That's why the process can't be rushed, and it can't be guesswork.
Before you even touch any part of the machine, you need to do three non-negotiable pre-checks. First, verify that you have all the correct changeover parts on hand. This isn't just grabbing the next size nozzle-you'll need size-specific plunger rods, syringe feed guides, fill volume calibration weights, and often a new sterile gasket or seal for the fill head (worn seals are a top cause of cross-contamination between sizes). Second, validate that your changeover team is trained and gowned properly for the aseptic area. Even a seasoned operator can introduce bacteria if their gowning is incomplete, so a quick gowning check (gloves no tears, hair covered, face shield sealed) is non-negotiable. Third, pull the batch record for your new syringe size. This isn't a generic checklist-every size has unique calibration points, and you need to reference the validated procedure specific to your SKU, not a one-size-fits-all guide. If you're using a modern, adjustable system like the ones we build at our facility, even those require tailored checks, so don't skip the batch record step.
Next, the shutdown step: properly decommissioning the current syringe size without introducing contamination. This is where many teams mess up. You can't just shut off the machine and yank out the nozzles-you need to perform a line flush and sterilization of the fill path first. For aqueous solutions (like vaccines or simple injectables), a sterile flush of the entire fill manifold with WFI (Water for Injection) is standard, to clear any residual product that could dry out and become a particle hazard. For viscous products (like monoclonal antibodies or hormone therapies), you may need a flushing agent compatible with your product, plus a second flush to ensure no thick residue is left behind. Once the fill path is flushed, you need to cap or seal any open ports to maintain asepsis while you perform your changeover. Never leave sterile parts exposed to the controlled environment for longer than necessary; most guidelines limit exposure to 30 minutes or less, so work efficiently but carefully.
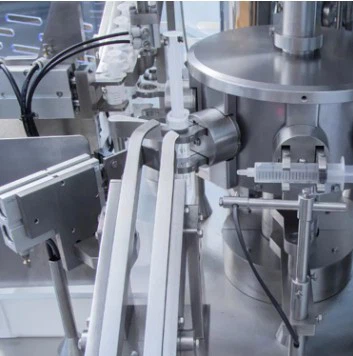
Now comes the physical changeover of parts. This is where having a compatible, modular design (like our line of syringe filling equipment) makes all the difference, vs. a machine that requires hours of custom adjustment. Start with the simplest parts first: remove the current syringe feed guides. These are the plastic or metal tracks that align syringes as they move along the line, and they're size-specific-an 1mL syringe will rattle or jam in a guide made for 3mL syringes. Take the new size guides, make sure they lock into place securely, and do a visual check by sliding a test syringe through by hand to ensure it moves smoothly without tilting.
Next, remove the fill nozzle assembly. Nozzles are precision-machined for each syringe size-too small a nozzle will cause overflow, too large will leave residual product on the syringe rim, which is a contamination risk. When installing the new nozzle, use a torque wrench to tighten it to the manufacturer's specified torque (over-tightening can strip threads or warp the nozzle, under-tightening can cause leaks). If you're switching between very different viscosities, you may also need to swap the piston in the fill pump-this is a routine change for high viscosity, which we make easy on our systems with quick-release pump couplings.
Once the physical parts are swapped, the next step is calibration, which is the most critical part of the changeover and where most failures happen. Calibration has two key parts: volumetric accuracy and syringe alignment. First, volumetric accuracy. You'll need to run a test series of fills using sterile, empty syringe barrels (matching your new size) and a calibrated analytical balance. For each fill, you'll weigh the filled syringe, subtract the tare weight of the empty syringe, and confirm that the net weight matches the fill volume specified in your batch record. For example, if you're filling 2mL, each syringe should weigh approximately 2.0g (assuming a product density of 1g/mL; adjust if your product is aqueous vs. non-aqueous). Run at least 10 test fills, and the average weight should be within ±0.5% of the target, per FDA guidelines. If it's off, you'll adjust the fill pump's stroke length, not the nozzle size-changing the nozzle won't fix volume discrepancies, it'll only fix dispense accuracy at the needle tip.
The second calibration step is syringe alignment, to prevent damage during the filling process. This means checking that the syringe plunger will seat correctly, that the fill needle is centered in the syringe opening, and that the cap or stopper placement (for pre-filled syringes) is aligned properly. To test this, run a handful of empty syringes through the line without product, and check for bent barrels, scratched glass, or misaligned stoppers. A common issue I see with smaller syringes (like 0.3mL insulin syringes) is that the plunger rod is too long, leading to plunger marks inside the barrel; the fix there is a quick adjustment of the plunger stop, which is a size-specific setting. If you're new to this process, don't skip this step-even a tiny scratch on a glass syringe can lead to a crack during autoclaving, or worse, during shipping to a patient.
After calibration, you need to perform a full line validation test, often called a "dry run" before you introduce sterile product. This is where you test the entire sequence: syringe feeding, filling, stopper placement, and cap crimping, all with empty, sterile syringes. You'll also test for cross-contamination by running a "switchover between products" test, if you're switching between different formulations alongside syringe sizes-this is especially important if you're switching between a sterile saline solution and a biologic, where cross-contamination could lead to drug incompatibilities. For this, most teams run a "swab test" of the entire fill path after changeover, to check for residual product from the previous size. At our company, we integrate line validation tools into our syringe filling equipment, so operators can generate a digital record of calibration weights, alignment checks, and swab results automatically, which simplifies batch record documentation for regulatory audits.
Wait a minute, if you're handling both syringes and vials in your facility, you might be wondering if changeover processes overlap. The short answer is yes, but syringe changeovers have stricter sterility requirements than vial changeovers, because pre-filled syringes are closed at the fill stage before sterilization. If you're managing a multi-product line that handles both, our Pharmaceutical Vial Filling Line can be adjusted for vial changeovers separately, so you don't have to run full syringe changeover steps when switching between vial sizes. That flexibility is key for facilities that make multiple dosage forms, so you can optimize downtime for each process.
If you're switching between even larger syringe sizes, like 10mL or 12mL pre-filled syringes, you'll have an extra step: testing for crimping force. Larger syringes need more pressure to crimp the cap securely, but too much force can crack the glass barrel. Most high speed pre-filled syringe vacuum filling lines (the type we manufacture for large-scale commercial production) have built-in crimp force sensors that automatically adjust, but if you're using a smaller, manually operated system, you'll need a separate crimp tester to verify force is within the specified range. This is a common pain point for teams scaling up from small-batch biotech to commercial production, and our team works closely with clients to adjust these settings without downtime.
Now, the final part is documentation, which is non-negotiable for regulatory compliance. Every step of the changeover-pre-checks, part swaps, calibration weights, validation results-needs to be recorded in your batch record, and signed off by a trained operator and a quality control specialist. This isn't just paperwork; if you ever have a batch failure, the FDA will audit your changeover records to see if you skipped a step, and gaps here can lead to a full hold on your production line. Many of our clients use our equipment's integrated software to auto-generate these records, so you don't have to manually log every weight, which reduces human error and speeds up audits.
Let me share a real example of a mistake we helped a client fix last year. A mid-sized vaccine manufacturer was switching between 1mL and 5mL syringe sizes, and they skipped the flush step when changing over, leading to residual vaccine from the previous size mixing with the new vaccine batch. They had to scrap a full batch of 20,000 syringes, costing over $100,000 in lost product and downtime. We worked with their team to revise their changeover SOP, adding a mandatory WFI flush and swab test, and integrated a digital checklist into our syringe filling equipment that requires operator confirmation of every step before the line can start. After that, their changeover downtime dropped by 40%, and they haven't had a cross-contamination issue since.
So, to recap the key steps to change over between syringe sizes on aseptic fillers: first, do pre-checks for parts, gowning, and batch records. Second, properly flush and seal the current line to avoid cross-contamination. Third, swap size-specific parts (feed guides, nozzles, pump components). Fourth, calibrate volumetric accuracy and syringe alignment. Fifth, run a dry validation test and swab for residue. Sixth, document every step for compliance.
If you're looking to upgrade your equipment to simplify these changeovers, our line of Syringe Filling Equipment is designed with modular, size-compatible parts and integrated validation tools that cut downtime while keeping you in full compliance with global regulatory standards. We also work with facilities that need to switch between different dosage forms, so our Pharmaceutical Vial Filling Line can integrate seamlessly with our syringe systems for end-to-end production. For high-volume commercial production, our High Speed Pre-filled Syringe Vacuum Filling Line is built for fast, validated changeovers between sizes up to 10mL, with real-time calibration tracking to minimize errors.
If you're struggling with inconsistent changeover downtime, compliance gaps, or frequent batch failures due to size switches, our team can walk you through a custom audit of your current process, or help you design a changeover SOP tailored to your specific products and equipment. We work with facilities across the globe, from small biotechs to top pharmaceutical manufacturers, and our goal is to help you run your line as smoothly, safely, and efficiently as possible. Don't let syringe size changeovers be a source of stress-reach out to our team to discuss your needs and find a solution that works for your operation.
References
- U.S. Food and Drug Administration (FDA). (2023). Guide to Inspections of Aseptic Processing and Sterile Drug Products. Center for Drug Evaluation and Research.
- European Medicines Agency (EMA). (2022). Guideline on Good Manufacturing Practice (GMP) for Medicinal Products for Human Use. Annex 1: Manufacture of Sterile Medicinal Products.
- Parenteral Drug Association (PDA). (2021). Technical Report No. 46: Changeover for Pharmaceutical Manufacturing Operations. PDA International.
- ISO 13485:2016. Medical Devices – Quality Management Systems – Requirements for Regulatory Purposes. International Organization for Standardization.